
Part 3: Apply Gold Leaf
Steps 11-18
Since the time of the earliest icons, pure gold leaf has been applied to the backgrounds of tempera panels to imbue them with a sense of the heavenly and divine — as well as to increase visibility of paintings in candlelit churches. The technique of gilding has changed little in the last thousand years, and still provides artists a tool to create a sense of richness and spirituality in their work.
| 11 | Incise the panel |
The first step in preparing a panel for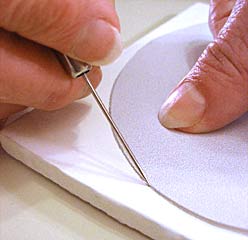 gilding is to lightly scratch an outline of the area where gold is to be laid. Since the gold cannot be applied along precise lines, incising also allows the artist to see the line (under the gold) up to which paint will later be applied.
Using a needle-like incising tool, scratch lightly with about the same pressure as you would writing with a pencil. Pressing too deeply into the smooth surface can cut the gesso, and scratches will show up in the final panel.
Templates may be used to guide the tool in order to create smooth, even areas for gilding.
| 12 | Mix the bole |
Bole — also known as burnishing clay — is applied 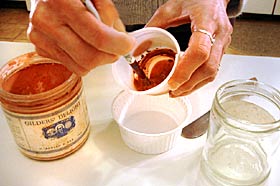
to the panel as a binder for laying the gold. Its red color also creates a warmth underneath the translucent leaf. Bole is a natural clay substance containing iron oxides which is ground to a
very fine finish, as any grit would ruin the appearance of the gold. For use
in gilding, it is mixed with sizing (gelatin and water) to form a wet, reddish
paste.
To prepare enough bole for gilding one panel, prepare the sizing (as in Step 3) by mixing ¼ ounce of powdered gelatin with four ounces of water. Placethe mixture over hot water, then stir until it's thoroughly dissolved and hot to the touch.
In a small cup, measure from ½ - 1 teaspoon of bole (depending upon the amount of gold to be laid), then add enough of the sizing solution to create a thin, smooth mixture. Set the cup into a pan of water (which must be kept hot) so that the gelatin will not set up during the entire procedure. Make sure that no undissolved particles of bole remain.
| 13 | Apply the bole |
Using a soft, round paintbrush, 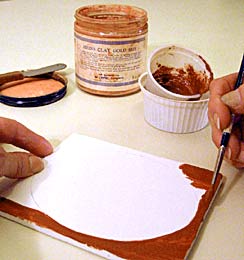
apply four successive layers of bole, allowing
each layer to dry completely to the touch (a few minutes) before continuing.
Lay the thin coats of bole as smoothly and evenly as possible so no lumps
will appear beneath the gold. Once the bole is applied, do not continue working
the layer to smooth it, as the mixture sets up quickly.
After the fourth coat is dry, take a small strip of extra-fine sandpaper (emery paper) and fold it so you can rub the sanding surfaces together in order to remove most of the abrasive particles.
With this fine, softened emery paper, polish the dried bole gently to smooth out any particles or unevenness. Do not sand or rub hard. Then, with a clean cloth, gently wipe the panel to remove any traces of dust.
| 14 | Cut the gold |
Modern gold leaf is pure — or nearly pure — gold flattened into sheets only four to five millionths of an inch thick (more info). 
The leaves are so fragile that they cannot be touched by hand or will disintegrate. The gold will also permanently stick to anything even slightly damp or greasy. Traditional panel gilding is done with leaves of loose gold, which require special tools and training
to handle. In this tutorial, we'll instead use patent
gold, in which the leaf is attached to a thin tissue, which can be
held and cut with scissors, making application easier. Patent gold can be
purchased in 'books' of 25 leaves, each 3 3/8" square.
Pieces of gold are laid onto the panel so that each individual area of gilding is completed before moving on to the next. Within each area, pieces of gold leaf are laid so that each piece very slightly overlaps the previous piece, assuring they'll adhere and form a solid layer.
Begin by holding a leaf of patent gold above the first area to be gilded, gold side down, making sure not to touch the gold. Using a small pair of scissors, cut a section that closely approximates the required shape. Don't try to cut too carefully, rather make sure that each piece is large enough to fill the space. It wastes less gold to put on a slightly larger piece, and remove bits later, than to add small pieces later to the area that were missed.
Cut and lay the pieces one at a time, so as to make sure each succeeding piece will fit properly.
| 15 | Wet the bole |
Wetting the bole is necessary to activate
the gelatin in the bole, which is what adheres
the gold to the gesso.
In a cup, mix three ounces of water with ½ ounce of ethyl alcohol. Dip a round brush into the alcohol mixture and spread a thin layer onto the area to be gilded. Let it dry to the touch, then repeat the wetting twice more. This process softens the bole and assures proper contact will be made with the gold leaf.
Once the bole has dried for the third time, wet it again and, while still wet, proceed immediately to the following step.
| 16 | Lay the gold |
Working quickly, while the bole is wet, position the cut piece of gold over the area to be gilded and lay it into the wet bole. As the water soaks in, the gold will be drawn quickly into close contact with the surface. 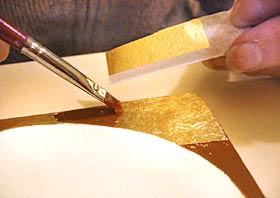
To assure good contact, the gold must be pressed
down firmly (but not rubbbed) with a piece of absorbant cotton until the tissue
backing appears dry.
If the bole had dried in any spots before the gold was applied, the gold may come off the panel when the tissue is removed. To check for this, gently lift the edge of the tissue. If any gold is still on the tissue, do not remove it, but press it back down into place. With your brush, rewet the top of the tissue and again press firmly with the cotton. Once you've determined that the gold has fully adhered to the panel, lift off the tissue.
Throughout the process, make sure not to drip water or wet the gold leaf that's already laid, or the surface will become dulled.
If, despite your efforts, the gold does not adhere to an area of the bole, you can repair small sections (a process called "faulting") by later adding small pieces of gold. Do this by rewetting the bole and laying a small patch of gold leaf over each area, again pressing with the cotton until the tissue backing is dry. It's best to leave faulting until the rest of the gold is laid on the panel — at that point, you'll often be left with small pieces of leaf suitable for this purpose. Alternately, leaving small areas where the red bole shows through can be desirable, providing an antique look to the gilding.
Repaeat these two steps, first wetting and then laying gold, working your way all around the panel. Once the panel is gilded, cover with a clean cloth and allow it to dry for several days.
| 17 | Burnish |
Burnishing gold is what gives the metallic surface its characteristic
gleam. To do this, we use a burnishing tool, 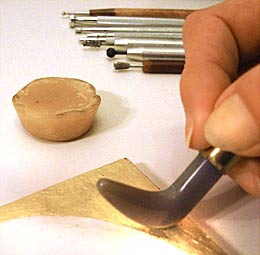
typically a shaped and polished agate stone attached to a long handle.
Using a light pressure at first, rub the stone over the gold in a circular motion, working in one direction only. Pressing too hard can damage the gold in spots that may be rough or damp. One way to avoid this is to rub a little beeswax onto a piece of soft leather, and then touch the burnisher to the leather to pick up a small amount of wax. The waxy surface allows the burnisher to slide more easily over the gold.
After you've gone over all the gold once, burnish again using a bit more pressure, stroking with the tool in another direction (e.g., up and down). Repeat this process, increasing the pressure slightly, two or three more times. This assures a variation of lights and darks on the gold surface. Make sure not to leave any spots unburnished to avoid dull streaks in the final result.
At this point in the process, the gold is extremely thin and translucent, and burnishing brings some of the underlying clay's color out through the gold to warm or accent it. Wearing cotton gloves can help prevent oils on your hands from dulling the surface. Also, returning to the panel a few days later, after the gound has fully set to do a final burnishing can give the gold an extra sheen.
| 18 | Stamp the gold (optional) |
A decorative technique frequently used in creating religious
icons, 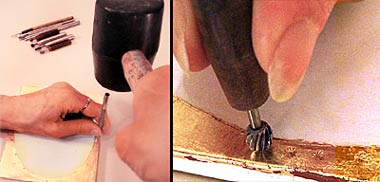
stamping can give the gilded panel an added elegance by catching and reflecting light from small indentions punched into the gold.
In Medieval churches, the added facets on the icon's surface helped give
the impression of illumination emanating from the panel.
Contemporary punches are metal tools tipped with geometric shapes. These are positioned as desired on the burnished surface and struck with a rubber mallet to impress the design into the gold leaf. When stamping, it's important not to break the surface of the gold (or, worse, to crack the gesso surface).
The smaller the punch tip, the lighter the stroke used to impress the design. A larger, more complex punch needs to be stroked harder to ensure that the entire pattern is impressed into the gold.